

Does Tuff Shed Do Repairs After Warranty Is Over?
| Tuff Shed Tuff Shed Installation, Review, and Repairs Installation - April 10 - 11, 2022 Repairs washed by Tuff Shed - July 12, 2022 (Run into below in ruby-red) Hail - April 21, 2022 - Harm and repairs (Lesser of page) | ||||||
| When we purchased our new home in June 2022, we had set bated some money to have physical slabs poured and to purchase a storage shed. After waiting for no-freeze days in the Spring of 2022 we were finally able to go this task done. Storage Shed Placement After living in our new house for nine months, I now had a better idea of where I wanted the concrete slabs to become. This 9 calendar month delay, could be seen as a blessing. What had happened during this fourth dimension period, was rain and where information technology pooled in our backyard. The pelting turns a portion of our backyard into a lake during heavy downpours, right where I had wanted the storage shed to go in the southeast corner of our backyard. If I had immediately had a storage shed installed in this corner when nosotros moved in, it would take been a costly mistake, even with a cement foundation. The second selection was the northeast corner, which was worse. The southwest corner is out of the question because our septic arrangement is there. The only corner left in the g, was the northwest corner of our chiliad. | ||||||
| | ||||||
| I want this storage shed to be as far abroad from the house as possible considering it is where flammable materials like gasoline and propane will be stored. So the northwest corner of the thousand is where the shed will go. The rain does puddle a picayune in this area during downpours....but with a 5" slab of concrete and the raised bottom of the shed, the flooring of the shed volition not take water sitting in it afterward it rains. Based on the rain we have had this by nine months, only a couple inches of rain pools here until information technology moves downhill or is soaked into the ground. | ||||||
| | ||||||
| | ||||||
| ||||||
| A simple 12' ten 16' shed was all I could afford with my budget. The only additions I added were a 3' ten 3' window, vents on two walls, and a half dozen' wide double door. I volition be painting the shed myself and creating the shelving and hanging system inside. Solar powered barn lights will provide lighting inside. At this time, there will be no electricity in this shed. Storage Shed Concrete Slab Size With my shed picked out, I could and then make up one's mind the size of the concrete slab. I decided on a slab that is 1 foot wider than the shed. 14' x xviii'. This manner if something is leaning against the wall of the shed, it can rest on the concrete and non the ground. This volition too give us at least 3' of space between the shed and the fence. The 252 sq ft of concrete will be 5.5" high. | ||||||
| | ||||||
| | ||||||
| | ||||||
| Later the foundation for the shed had been poured I was ready to finalize the purchase of my Tuff Shed. Why Tuff Shed? Tuff Sheds price more than other options. At that place are some cheaper sheds at the big box hardware stores. For those, the price they requite you for this size, is most $m less. However, y'all accept to put information technology together yourself. If I am going to do that, I might likewise make it from scratch. There are also a lot of complaints well-nigh these sheds. You can too opt to accept one of their individual contractor installers practice it, which will bring information technology up to the Tuff Shed price. I too found some bottom known or family unit run custom shed businesses on the internet in this surface area that used to be in business. Hmmmm If in that location is a warranty, I want to know that at that place is someone I can telephone call...... in say 2 or 3 years. This is why I went with Tuff Shed. They have been around for a while and the price includes installation. All I do is stand back, lookout, and take photographs. Making the Purchase of My Shed I went online to configure my shed. The website calls it "Build a Quote". Terminal August 2022 I went on their website to do this. Information technology was a breeze to do and fun. When I went on the website this March 2022, the website was at present very clunky to use and slow. I could not find items and the website basically pissed me off. I had to keep closing the website down and deleting their internet cookies and then starting over again with what I wanted, providing I could observe it. Instead of taking me an 60 minutes to do....it took me days. Because of this website change, I added on less features than I might take. I wanted the ramp and a baste edge over the door. I could not find these items. I simply wanted to Build My quote" and get the hell off the website asap. I'll add a ramp and drip edge afterwards myself. After Yous Build A Quote After you build your shed on the website and submit it, you get an east-mail confirming your quote which does not include revenue enhancement or any commitment charges they might want to tack on. Y'all will then become a telephone call from one of their sales people. Think car salesman. Where they tell you if yous buy right at present, I can have an additional....say $300....off the price, later I check with my manager. These sales people, peculiarly the ones that accept been around a long time, will exercise or say anything to make a sale. "Check with my manager" is bullshit. They have the authority to make a discount without checking with anyone. When I initially built my quote on March 21, 2022, I spoke with Keith Wells. After a 30 minute telephone call with me asking for the Exact toll of the shed with tax and delivery minus whatever promotional savings I finally got a toll of $4649.49. Merely to get this price he needed to become approving from his manager and he would call me dorsum on Monday, March 25, 2022. He said he could not do it sooner considering he was planning for a Home & Garden show somewhere in OKC. Keith Wells did not call me back. I estimate they did well at the Dwelling house & Garden show! I went alee and got my cement foundation laid, April 1-3, 2022. I then called Keith Wells dorsum at the OKC Tuff Shed office on April iv, 2022 and told him I was set to buy my shed. He then proceeded to tell me that the price was now in the $4800.00 range. I said whoa there..... Yous did non telephone call me dorsum when you said you would. Long story short, I got the original quote. Jeezzz.. it had only been a couple of weeks!! I can see jacking upward the price a year later on, not ii weeks later. What I bought: Premier Ranch 12' Ten xvi'. Upgrade of a 3' x 3' window, 2 vents, and a half dozen' double door opening. NO Pigment. | ||||||
| | ||||||
| Installation Day April ten, 2022 Upwardly until yesterday, communication with Tuff Shed had been most daily via their automation system. Primarily automatic text messages or eastward-mails telling me that my shed delivery is on schedule. The e-mail I received on Tuesday, April ix, 2022 let me know that my shed would be delivered tomorrow and I would receive an due east-mail with a fourth dimension range and the name of the installation crew. This email never came. Nor did I receive any phone calls!!!!!!! At 10:45am " I " fabricated the call to Tuff Shed in Oklahoma City and spoke with Chris to inquire, when my installation would exist. The responses I received were the basic bullshit responses you become when a company knows they fu**ed upward: -"Uh....nosotros had some call-in'south" According to the coiffure of Robert and Morgan, out of Shawnee, OK they did not receive the telephone call for the installation job until eleven:00 am. They did not call me on April x, 2022 until 2:00 pm. This was the first telephone call I received from this crew. What was going on between 11:00 am - 2:00 pm? Who the hell knows. Probably a lot of scrambling and the covering of asses. The crew did not actually show-up until 3:00 pm. A whole mean solar day wasted, waiting for the Tuff Shed crew to show-up. I already had a feeling that the installation would not be completed today. Oh... and I had came downwardly with a cold the day before. Then I was ill as a dog. This is the fourth dimension I should have been laying down and resting my body so it could battle the virus. But no....I needed to be upwards and set up to become when the crew finally showed up. If I knew they were coming this tardily, I would have stayed in bed resting until at least 2:00 pm. | ||||||
| | ||||||
| Installation The first thing that was put together was the 2″x 6″ hot-dipped galvanized steel floor joists on meridian of the cement slab. Tuff Shed uses these instead of force per unit area treated dimensional lumber. The one thing I changed about the placement of the shed was to move information technology forward on the cement slab so but three" of the slab showed in the front. This makes the cement ledge in the back wider, which is fine. | ||||||
| | ||||||
| After the flooring joists were screwed together, they placed cement bricks under the joists to enhance them off the cement. Wood wedges were likewise used to level the floor joists. They then installed the floor boards which is nix more than particle board. I would have preferred iii/4" plywood. | ||||||
| | ||||||
| | ||||||
| The walls had been pre-assembled at the factory. So they lifted them in place and attached them to the floor and so to the other walls. This assembly stage was non easy for them to practise considering of the winds we always have at this house. They needed to brace the edge of these walls because of this wind. What they should have done is move all of the walls to the worksite from the truck first. They kept going back and forth from the truck to the corner of the yard with a wall and installing it before going back to the truck once more to get another wall. I did not allow them to bulldoze on the grass because of the impairment the cement truck had done. | ||||||
| | ||||||
| | ||||||
| | ||||||
| | ||||||
| | ||||||
| | ||||||
| Needless to say, they did non finish the installation by 8:00 pm. It got too dark to piece of work. In that location are no street lights where our house is. Without the moon, it is pitch blackness exterior. Before they left, I asked what fourth dimension they would exist here tomorrow to finish the work. Robert told me seven:00 am. I remarked about how early that was. They assured me they would be here at 7:00 am. | ||||||
| Installation continued April 11, 2022 | ||||||
| vii:00 am came and went with no installers. At 9:00 am I called Tuff Shed to inquire where the crew was. Chris at the Oklahoma Urban center Tuff Shed said he would phone call the team to observe out where they were. 1 hr later, I received a call from Chris telling me that the installation team would call me. Robert chosen a few hours subsequently telling me they were on the way and that he had truck problems early in the morning time. More bullshit! If he had problems with his vehicle in the morn, he should have called. They did non show upwards until 5:00 pm!!!!! Another twenty-four hour period wasted waiting. Oh and I was feeling sicker than the mean solar day earlier. By the time the installers finished, it was dark again. A lot of time was spent on the double doors. They had a hard time getting them even and closing properly. The door on the right side, with the handle, was not closing flush with the door on the left. They repositioned the screws about 4 times. I know this because I was watching them and I had to fill up all these holes before I did the painting. The Survey I DID NOT fill up out When they were washed with the installation, Robert asked if I would fill out a survey on his phone. Tuff Shed sends a survey to their installer's phone using DocuSign. He wanted me to fill out the survey on his telephone standing outside in the dark. Bullshit! What kind of scam is this???? If Tuff Shed really wants survey answers that reflect the actual piece of work done, they don't ask y'all to fill information technology out on their installer's cell phone where they know what your answers are. As well, they should not exist doing this on a phone, considering the blazon is likewise modest for most folks to read. Additionally, after the install is the worse time for a survey because almost customers just want the installers to g-o a-w-a-y later spending hours disrupting their lives. I had dogs that needed to use the bath later on holding information technology for hours. I told Robert I would not being filling out any survey on his phone because I would not be able to read information technology. I told him to tell Tuff Shed to email the survey to me instead. The next day I received an email, but it was not the survey. It was the original documents I signed when I bought the shed. I tried phoning Tuff-Shed. It kept going to vocalization mail service. I suspect they were ignoring my calls which are easy to spot on caller ID considering I have an out-of-state area code. I then sent an eastward-mail service to the dimwit in their office that sent the wrong certificate, asking where the survey was and where is a copy of my warranty. They sent both the survey and warranty to me via DocuSign. I was unable to fill up out the survey. The document said this was done already. Again, bullshit. I did not fill out the survey or sign annihilation maxim the installation was complete. Since Tuff Shed patently does not intendance about my experience with their product.....this spider web page will be around for many, many years instead.....with the practiced, the bad, and the ugly. | ||||||
| The Tuff Shed Warranty Tuff-Shed has a standard vii yr warranty on materials and workmanship for the Premier Series. I did not meet this warranty until after the shed was installed. The warranty was supposed to be in the original contract documents. After reviewing the documents several times after the installation, I realized that the warranty was Non with the original documents. Whoever reads this, learn from my mistake. Make sure the warranty is with your buy contract when they email it to you and read information technology. What I wish they had told me prior to finalizing my order, was the painting of the outside. Co-ordinate to the warranty: "In order for this warranty to exist valid, all exposed surfaces must be painted within ninety-days (90) of installation, repainted every five years thereafter (proof of pigment purchase required) and properly maintained." When I ordered the no paint pick, the Tuff Shed website did not let me know that I would need to pigment the shed within 90 days or my 7 year warranty would be void. Nor did the salesman say annihilation virtually this. Yes, I know. The warranty is right there on their website where I could have read it. It would have been nice to take been reminded of this. Why don't they remind you lot about the 90 days when you identify your non-paint guild????? 1) If the shed does non have to exist painted, the product moves faster from the factory ii) They don't tell you about the ninety days considering they desire you to NOT paint it. When I ordered my shed, I ordered the no paint option considering I wanted to paint the shed myself. In fact, I had already purchased the paint primer for the shed prior to April ten, 2022 to accept advantage of a sale at Sherwin Williams. And yes, I take the receipt. I wanted to paint the shed myself because I knew that I would exercise a better job than Tuff Shed. I am pretty sure their paint task would involve a single thick glaze of a water based paint, sprayed on each of the assembled pieces. No caulk on seams. Blast holes not filled. No primer. Every bit of Apr 28, 2022 my Tuff Shed has been caulked, painted with an oil-based primer, then painted the final color with Elapsing past Sherwin Williams. My shed was painted within 30 days. Receipts have been placed in a file. Therefore, my warranty will not be void if there is a problem in the side by side 7 years. | ||||||
| | ||||||
| ||||||
| ||||||
| | ||||||
| | ||||||
| ||||||
| ||||||
| | ||||||
| | ||||||
| ||||||
| ||||||
| | ||||||
| | ||||||
| | ||||||
| Problems With My Tuff Shed or Things I Just Don't Like Repairs done by Tuff Shed July 19, 2022 During the end of June 2022 someone in California (equally the story goes), came beyond this web page. The link for the web page was transferred to a Tuff Shed corporate office and then the General Manager of the Oklahoma City Tuff Shed was contacted and yelled at. See what happens when they don't let you make full out a review? The review gets posted someplace out of their control and all of a sudden heads are spinning. I was then contacted via telephone past Scott Valdez, the General Manager of the Oklahoma Urban center Tuff Shed. I have to give credit where credit is due..... Scott bent over backwards to brand me happy and endeavour to set everything that was wrong with the shed. After the initial telephone phone call, Scott drove down from OKC to see my Tuff Shed in person. I went over everything with him that was wrong with the shed and the problems I had with the installers (arriving late in the day, etc) He also brought with him some 4 human foot long ramps to effort out on my shed. In about a calendar week, he contacted me to schedule the twenty-four hour period that his warranty man, Will, would come out to my shed and fix all of the problems. For each of the items I had a problem with, I have addressed the Tuff Shed repair solution below in RED.... 1) Door Latch The i affair that took the longest on this installation, were the doors. When they were installing the doors the right side was not closing affluent to the left side. The problem with this over time is that the pelting and lord's day will continue to hitting this edge. Causing information technology to swell up and shrink over time and be the first office of the door siding to fail. I pointed this out to the installers. Trying to fix this involved them attaching and removing the door at to the lowest degree 4 times. My husband and I watched with great amusement equally the installers tried to effigy out the problem with this door. I had made it clear that they would not exist able to go out until this trouble was resolved. Their ultimate solution to the correct door endmost flush to the left door was to install the strike plate or the door latch catch to the farthest extreme of the left door. If you pull really hard on the door or slam information technology really hard, it will "just" catch on the door latch and hold it closed. Sorry, not expert enough!!!! I let the idiot installers leave. They were not able to correctly solve the consequence. I would figure information technology out and fix the latch. | ||||||
| | ||||||
| ||||||
| TUFF SHED REPAIR - Will, from Tuff Shed, informed me that the top spring bolt should have been installed more to the right on the inside of the door. This way the screws would non have protruded through the edge of the door. Other than the screws protruding out, the bolt works fine where it is. To fix the screw problem, Will took out the screws and cut off the tip about ane/four" of an inch and screwed them back in. He did not have shorter screws. This hack works! Every bit for the door latch, information technology is supposed to have some "spring" to it. At that place is a screw that tightens the spring action of the handle making it easier to operate. In my shed'due south case the handle was tightened too much. Will loosened the spiral and the handle at present operates similar it should. | ||||||
| two ) Single two ten 4'south on Corners - Tuff Shed Does Not Use Double ii x 4's on CornersI have been building closets and sheds for a number of years now (See any of the following: El Paso Storage Shed , El Paso Garage Closet , and Oklahoma Garage Cupboard ) I always use double 2 ten 4 structure on gratis-standing corners (corners that are not against a wall) In some cases, I just use the double 2 x 4'due south because it makes for a sturdier construction. Tuff Shed does not use double two x four's in the corners. In that location is only i 2 ten four in all of the corners. Hmmm.... at a price of only $two for a ii x four, they could have done better. TUFF SHED REPAIR - No repair done. This is how they make their sheds.Of note, the bones framing of my shed has been reinforced on i side with the sturdy 2 x 4 and plywood shelves on the non-window side of the shed. The entire shelf structure I designed is stiff and can concord a lot of weight including a 200 lb adult climbing on it. The 2 x 6 pieces of wood nailed betwixt the framing for the hanging organization I designed, also reinforces the basic framing. | ||||||
| | ||||||
| ||||||
| TUFF SHED REPAIR - None. Non included with Tuff Shed. Notwithstanding, a shed owner can buy these rafter brackets or hurricane ties cheaply for $two-3 and install them in almost 30 minutes or less. | ||||||
| iv ) Attaching Trim to Walls ON TOP of Air Vent Really? I mean.......really? What the hell!! Who does this??? Tuff Shed! I went to remove the vents prior to painting and discovered this. In order to change these vent covers in the time to come, I volition have to pry off the trim first. There are narrower vent covers on the market place that Tuff Shed could have used. I needed to mask the vent before painting instead of removing it. I will cross my fingers and hope that the encompass does non become damaged in the future then I do not have to replace it. ** 2022 - Hail update at the bottom of this page regarding these air vent covers TUFF SHED REPAIR - None. At my request. Why? Because to set this problem would mean removing all of the trim. Call back the caulking, the paint primer, and then the concluding paint that went onto the exterior of this shed? I told Scott that I did non want this stock-still because of the work I would have to do on these areas caulking and repainting information technology later on they fixed it.He did agree that something was not right virtually this and the trim should not accept been placed on top of the vent edges. He commented almost some type of computer design trouble. Still, come on.......if all of the sheds are like this, someone should accept noticed this before. | ||||||
| | ||||||
| five ) Unsightly Bottom of Shed as a Result of Leveling with Cement Blocks and ShimsI will mention this before I begin......Tuff Shed does point-out the unsightly shimming of the shed that will be very visible when they level the shed. Yes, it is very ugly. The shims that are on the edge will weather condition and fail somewhen from pelting and sunday exposure. In Tuff Shed's "What to Expect" certificate ( run across this document here...), which they send you lot when you buy your shed, they provide pictures of this. They inform you to consider the advent.Not until the 4th folio of this document exercise they mention that skirting is bachelor. Withal, this skirting is fabricated from the same siding they use on the shed, which will rot if it is sitting in h2o at the base of a shed. The skirting volition likewise seal-upwardly any ventilation you have under the shed. Y'all want ventilation nether the shed to prevent any type of wet build-up. | ||||||
| | ||||||
| My shed needed very trivial leveling. There was a piffling more leveling needed at the dorsum and eye of the cement slab. Subsequently it rained, I had noticed this low spot earlier the shed was installed. A departure of about a i/2". While painting the shed, I painted the floor joists at the bottom. I figured they were steel. Therefore, they would eventually rust. Paint would provide some protection. Simply.......I demand to cover-up the large gap at the bottom of the shed. Cover information technology upward.....Non seal it up. I needed to discover something to cover this surface area but have holes to allow the air in. I needed something with small holes. At that place are 2 creatures I need to go on away from underneath the shed........ Snakes and toads / frogs. There are poisonous snakes mixed in with the non-poisonous snakes in this area. I don't want either living under the shed fix to bite me or the dogs.
The plan is to cut the aluminum sheets into half dozen" wide strips three' long. To embrace-up the bottom of this shed I volition need 16' + 12' + 12' + (12' - 6' door ramp) = 50 linear feet. Each sheet volition give me 6, 3 foot strips for a total of xviii feet. So I will need three sheets of the three' ten 3' for a total of 48 linear anxiety. At the time of my purchase both Amazon and Dwelling Depot had this product for the same price of $32.98 for one sheet. Shipping was free on both web sites. I went with Amazon because they transport faster.
| ||||||
| | ||||||
| | ||||||
| | ||||||
| TUFF SHED REPAIR - None. Scott showed me some plugs he had for the holes in the metal which does cipher to address the ugly shims and the gap that allows critters to get in underneath the shed. After all of the work that I put into installing the shed lesser cover, nothing Tuff Shed could offer would replace it. | ||||||
| ||||||
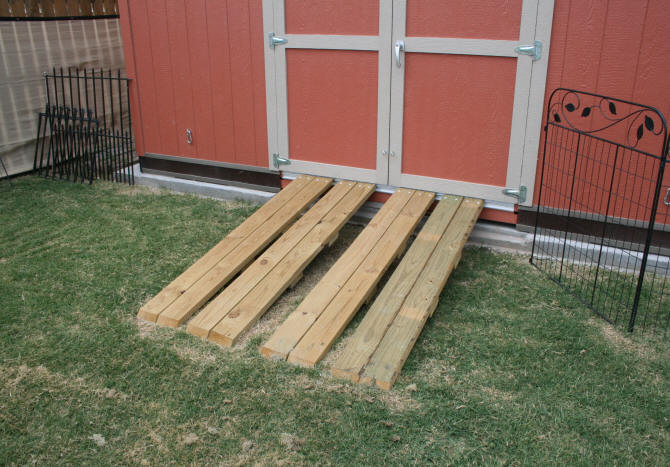
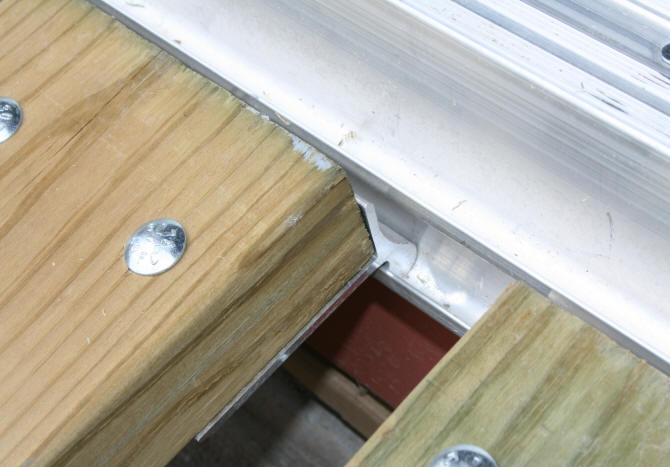
| What I like about this ramp system: ane) Is that it works with the existing doors. What I don't similar: i) Is that the ramps are heavy for me and hard to move up and down with bad hips and back. two) Is that you lot take to keep moving them up and down every fourth dimension we remove the backyard mower. My hubby is at present again leaving the mower out of the shed because it is a hassle to move the ramps upward and downwardly every week he mows the lawn in the summertime. You lot have to keep moving them up and downward considering the doors volition not close with the ramp on the upper ledge. I would prefer a ramp that is permanent and does not have to moved upward and downwardly all of the fourth dimension to accommodate the doors. Better to pattern a door that does non hang down so low below the opening. | ||||||
7) Window not gear up level into the opening which causes it to leak when it rains
| ||||||
| TUFF SHED REPAIR - The window pictured in a higher place is warped. Manufacturer defect or it was stored too long in a hot warehouse. Will from Tuff Shed took out the warped window and installed a new window. This window is at present straight. He as well centered it in the window frame better than the initial installers did. The only trouble with replacing the window, is that all new trim material was used effectually the window on the exterior. I will now have to pigment this area with primer and the final paint colors over again. I will have to wait until the temperatures driblet a little to do this because 90 caste temperatures tin can screw-up a pigment job existent quick because the paint dries on the castor before y'all can go information technology to the surface. | ||||||
| Hail - April 21, 2022 - Damage and Repairs | ||||||
| ||||||
| Only what nigh our Tuff Shed? How did it fair? I expected at least a few dents on the west side of the shed. On close inspection the adjacent morning time, I could non find a unmarried paring or chipped paint in the siding. Like I mentioned above, when I talk virtually painting and the siding, the siding is a good product and will last decades if cared for properly. My paint job probably helped. The roofing nonetheless, needed to be replaced, like the house. The air vent cover did Non fair besides. | ||||||
| | ||||||
| At this signal, I will discuss the vent covers that Tuff Shed uses on the outside of their sheds. These particular vent covers are actually soffit vent covers that sell for nigh $2 and are made of low-cal-weight aluminum. I know this because I installed about 50 of these on our old house. I repeat, they are soffit vents, meant to be used upside down over a soffit vent, underneath the soffit. Which means, unless a slice of hail hits the ground and bounces up 8 anxiety or more underneath your soffit, these soffit vent covers do not see much action. Stick them on the exterior of your business firm during a hail tempest, they volition get shredded. After looking online for louvered vent covers fabricated out of a more durable material than aluminum, I settled for some steel (not aluminum) registers that are actually meant for the within of a house. About $10. They are a whole lot stronger than the soffit vent covers. Nevertheless, because they are steel, they volition rust. | ||||||
| ||||||
| Page last updated August 25, 2022 https://laurellynn.com/KidsZone/ | ||||||


Source: https://laurellynn.com/HomeRepair/tuff_shed.htm
Posted by: jacksonorwil1936.blogspot.com
0 Response to "Does Tuff Shed Do Repairs After Warranty Is Over?"
Post a Comment